Posts

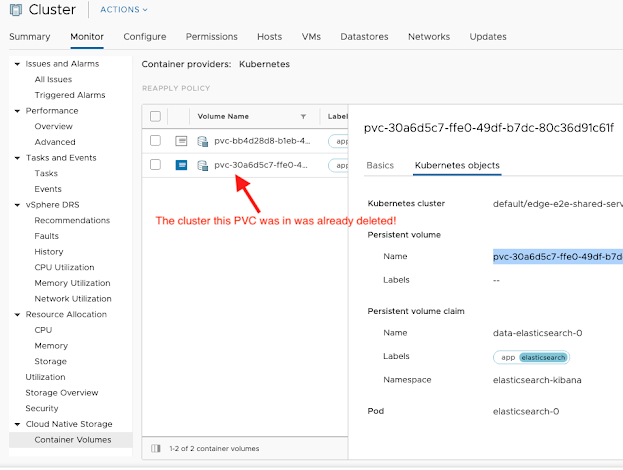
Removing Phantom Container Volume in vSphere 6.7u3

Image
I've been playing around with Tanzu Kubernetes Grid on my vSphere 6.7u3 home lab setup, and so I've been creating and deleting clusters a lot lately. In browsing around vCenter, I noticed a new section in the Cluster and Datastore "Monitor" section called "Cloud Native Storage -> Container Volumes" that shows me all the persistent volumes that have been created with the more recent vSphere CSI Driver. Since I had been setting up my clusters with a default storage class like the following, I was now also able to visualize those volumes in the vCenter UI which is pretty neat: kind: StorageClass apiVersion: storage.k8s.io/v1 metadata: name: vsphere-sc annotations: storageclass.kubernetes.io/is-default-class: "true" provisioner: csi.vsphere.vmware.com parameters: storagepolicyname: "k8s Storage Policy" fstype: ext3 The new CSI based plugin (https://github.com/kubernetes-sigs/vsphere-csi-driver/issues/251 ) allows you to sim

Public IPs and PKS with NSX-T

PKS with NSX-T requires a number of "public" facing IPs for deployed Kubernetes clusters. "Public" in this case just means IPs that would be route-able on the network NSX-T is uplinked to. These IPs are pulled from the IP Pool defined as the "Floating IP Pool" in the PKS tile configuration in Pivotal Operations Manager. 1 IP to use for an SNAT rule for all the VMs for the k8s Cluster if those VMs are deployed in NAT mode 1 IP to use with a Virtual Server to front end the k8s Master Nodes 1 IP to use for an HTTP/S Ingress Virtual Server 1 IP to use for an SNAT rule for each namespace 1 IP to use with a Virtual Server for each LoadBalancer service provisioned So for each cluster PKS deploys you will consume at least the following (if in NAT mode): Type IP Addresses Cluster VMs SNAT 1 Master Node(s) Virtual Server 1 Ingress Virtual Server 1 SNAT for default, kube-public, kube-system, and pks-system namespaces 4 Total 7 On

Cleaning Up Stale PKS Kubernetes LoadBalancer IP allocations in NSX-T

I was working in a proof of concept environment using NSX-T where we didn't have a lot of IPs in the Floating IP pool for k8s clusters provisioned by PKS. We had two clusters deployed and we were trying to start up a few pods with a LoadBalancer service. The problem we hit was that the pods wouldn't startup, and were failing in the "Init" status. We weren't seeing enough details via kubectl , so we found the node that was trying to start the Pod's containers, and checked the kubelet.log for more details. Interestingly, we noticed some messages about NSX-T right before the pods failed. This got us thinking that although these particular pods didn't have any special initialization, NSX-T was doing some work to try and allocate resources for the Pod to expose it via a LoadBalancer service. On a hunch, I checked the NSX-T Manager, and went to Inventory -> Groups -> IP Pools section, and noticed that the Floating IP Pool had all the IPs allocated

Strategies for Parsing Service Information In Cloud Foundry

Cloud Foundry’s service marketplace provides self-service access to a curated set of services that have their lifecycle automatically managed by the platform.  Part of the lifecycle of any service instance involved connecting that service to an application through a process called “binding”.  There are a variety of mechanisms that an application can use to lookup the information that a binding represents, and I’ll try to write up some of the best practices. When a service instance is bound to an application in Cloud Foundry, the connection information and credentials for that service instance get exposed to the application as a block of JSON in an environment variable called VCAP_SERVICES. The format of that JSON is similar to the following: { "service-short-name": [ { "binding_name": null, "credentials": { "service-specific-key1": "service-specific-value1", "service-specific-key2": &quo

Local Troubleshooting Technique for CloudFoundry HWC Apps Running in Windows 2012R2

Cloud Foundry gives us a simple way to get Windows applications normally hosted in IIS to production quickly with the HWC Buildpack .  However, when the application fails to stage or run, it can be difficult to figure out what is going on.  You can actually run your application locally in a similar way to the way the HWC Buildpack would cause your application to run in Cloud Foundry by running the HWC executable locally against your app. The HWC Buildpack relies on the HWC project  to actually run your application in Cloud Foundry.  The HWC process uses Microsoft's Hostable Web Core to run a mini version of IIS in a process that your application is hosted in.  The HWC project creates releases of the executable  that you can download an run locally on your workstation. Before running HWC, you'll need to make sure your workstation has some pre-requisites installed.  If you go to the Running the Tests (Windows Only) section of the README.md in the HWC Project , you will see a

PowerCLI Script to Recover Pivotal Operations Manager VApp Settings

If you've read my previous blog post s, you know that I'm running a home vSphere lab on a shoestring budget with hardware that is "mostly" working "most" of the time. One of my NUC hosts locked up recently and I was noticing that my Pivotal Operations Manager VM for Cloud Foundry just wouldn't use the static IP address I had assigned to it at install. The networking settings are stored as VApp Options that you can set when you deploy the Operations Manager OVA. I figured that maybe the failure caused those settings to get out of sync, so I tried to update them again and save the updates, but I kept getting an error from vCenter Web Client say that it "Cannot complete operation due to concurrent modification by another operation." I thought something must be out of whack, so I removed the VM from inventory, and re-added it back. Of course when you do that you lose all the VApp options you had set, but you also lose the definition that

Running RabbitMQ's PerfTest tool in CloudFoundry

I recently had to troubleshoot performance of an app running in Cloud Foundry (Pivotal CF specifically) trying to use RabbitMQ.  The RabbitMQ team provides a great benchmarking tool that we can use to validate performance of a RabbitMQ cluster, and we can use that tool inside a container running in Cloud Foundry. The following instructions assume you are using the CF CLI version 6.23.0+ (check with cf -v), and running against a Cloud Foundry that supports CC API v2.65.0+ (check with the cf target command after logging in to validate.) First, download the latest RabbitMQ PerfTest zip archive from the link in the above paragraph.  I used GitHub releases page for the project, and just grabbed the latest release. Next, paste the following contents into a file in the same directory as the ZIP file you downloaded called "manifest-rabbitperf.yml" (making sure to update the "path" part to reflect the actual name of the ZIP file you downloaded: --- applications: - nam